
How to Make a Funeral Program
A funeral program is the printed pamphlet guests receive when they arrive at a memorial or funeral service. It guides them through the ceremony and serves as a lasting keepsake honoring the person who has passed. You may also hear it called a funeral bulletin, memorial program, or order of service. They all refer to the same thing.
This guide walks through every step of creating one: what to include, how to write each section, how the panels of a bifold layout are organized, and how to print the finished program at home or at a print shop. If you would rather start immediately, you can open our funeral program templates and begin editing right away for free.
What to Include in a Funeral Program
Before you open any template, gather as much of the following as you have available. You do not need every item on this list to create a beautiful program. Many families work with just a photograph, a few dates, and a paragraph or two about their loved one. You can always add more later or leave sections out entirely.
Funeral Program Checklist
Missing a few of these? That is completely fine. If you do not have a formal obituary, a few heartfelt paragraphs or a collection of favorite memories works just as well. If the ceremony is still coming together, a simple list of speakers and music is enough for the order of service. Start with what you have, and the program will still be meaningful.
A program with just a photo, a name, dates, and a short tribute is complete and meaningful. The items above are here so nothing is forgotten if you do want to include them.
Step-by-Step: Creating Your Funeral Program
Whether you use our online editor or another tool, the process follows the same general sequence. Here is each step in detail.
Choose a template that fits the service
Start by selecting a design that reflects the person and the tone of the service. A traditional funeral may call for a classic or faith-based layout, while a celebration of life might suit something with warmer colors or a nature theme.
All of our templates are bifold: a single sheet of 8.5 × 11 paper folded in half to create four panels. This is the most common funeral program format and works with any home or commercial printer. See example layouts here.
Gather your photos and service details
Collect the photographs you want to include. The front cover typically features one main portrait. Some templates also allow additional photos on the inside or back panels.
For the best print quality, use images that are at least 1 megapixel (roughly 1200 × 900 pixels). Most smartphone photos meet this threshold. Avoid heavily cropped or very small images, as they may appear blurry when printed.

The editor guides you through each section. Add your photos and text, and the template handles layout and formatting.
Write the front cover
The front cover is the first thing guests see. Keep it simple and dignified. Most front covers include:
- A heading line such as "In Loving Memory of" or "Celebrating the Life of"
- The full name of the deceased
- Date of birth and date of passing
- The main photograph
- Optionally, the service date, time, and location (some families place this on the inside panel instead)
Write the obituary or life tribute
The obituary typically fills the inside left panel. It does not need to be long. A few paragraphs that capture the person's life, values, and relationships is appropriate. A common structure is:
- Opening sentence: Full name, birthplace, and date of birth.
- Life summary: Education, career, passions, or defining qualities, whatever the family feels is most important.
- Survivors: Immediate family members who survive the deceased.
- Closing line: A sentence about their legacy or how they will be remembered.
If you have already written a newspaper obituary, you can use the same text or a shortened version. For wording ideas, see our funeral program wording examples.
Build the order of service
The order of service lists the sequence of the ceremony. It helps guests follow along and know what to expect. Most services, regardless of faith or tradition, follow a similar arc: a welcome, a time for remembrance, and a closing. A typical order includes 6 to 10 items:
- Prelude or musical selection
- Processional (entrance of the family or casket)
- Welcome and opening remarks
- Prayer, invocation, or moment of silence
- Reading (scripture, poetry, or a personal selection)
- Obituary or life tribute
- Reflections from family and friends
- Musical tribute, hymn, or recorded song
- Closing words, prayer, or benediction
- Recessional
Adapt this list to fit your service. A religious ceremony might include communion, responsive readings, or specific liturgical elements. A secular celebration of life might replace prayers with moments of silence or personal toasts. Military services often add a flag-folding ceremony and taps. For a detailed template with variations for different traditions, see our order of service template guide.
Write the back panel
The back cover is the final panel guests see and often the part they return to later. Families typically include one or more of the following:
- Acknowledgment: A thank-you message to attendees, such as: "The family of [Name] wishes to express heartfelt gratitude for your prayers, support, and presence during this time."
- Poem or scripture: A meaningful verse, psalm, or poem. Popular choices include Psalm 23, "Do Not Stand at My Grave and Weep," and "Gone From My Sight."
- Repast information: If a reception follows the service, include the location, time, and any directions.
- Pallbearer names: Some families list honorary and active pallbearers on the back panel.
Proofread carefully
Have at least one other family member review the program before printing. Check for:
- Correct spelling of all names (including maiden names and family members listed as survivors)
- Accurate dates (birth, passing, and service date)
- Correct service time and location
- Consistent formatting (for example, "January 15, 2026" vs. "1/15/2026"; pick one style)
Errors in a funeral program are painful to discover after printing. A second pair of eyes catches things the person who wrote the text will naturally miss.
Export and print
Once you are satisfied with the content and layout, export the program as a print-ready PDF. Print one test copy first to verify that the text is readable, the photos look sharp, and the panels align correctly when folded. Then print your full run.
See the printing section below for detailed instructions on paper, printer settings, and folding.
Understanding the Bifold Panel Layout
A bifold funeral program is a single sheet of paper folded once down the center, creating four distinct panels. When you hold the finished program in your hands, the panels appear in this order:
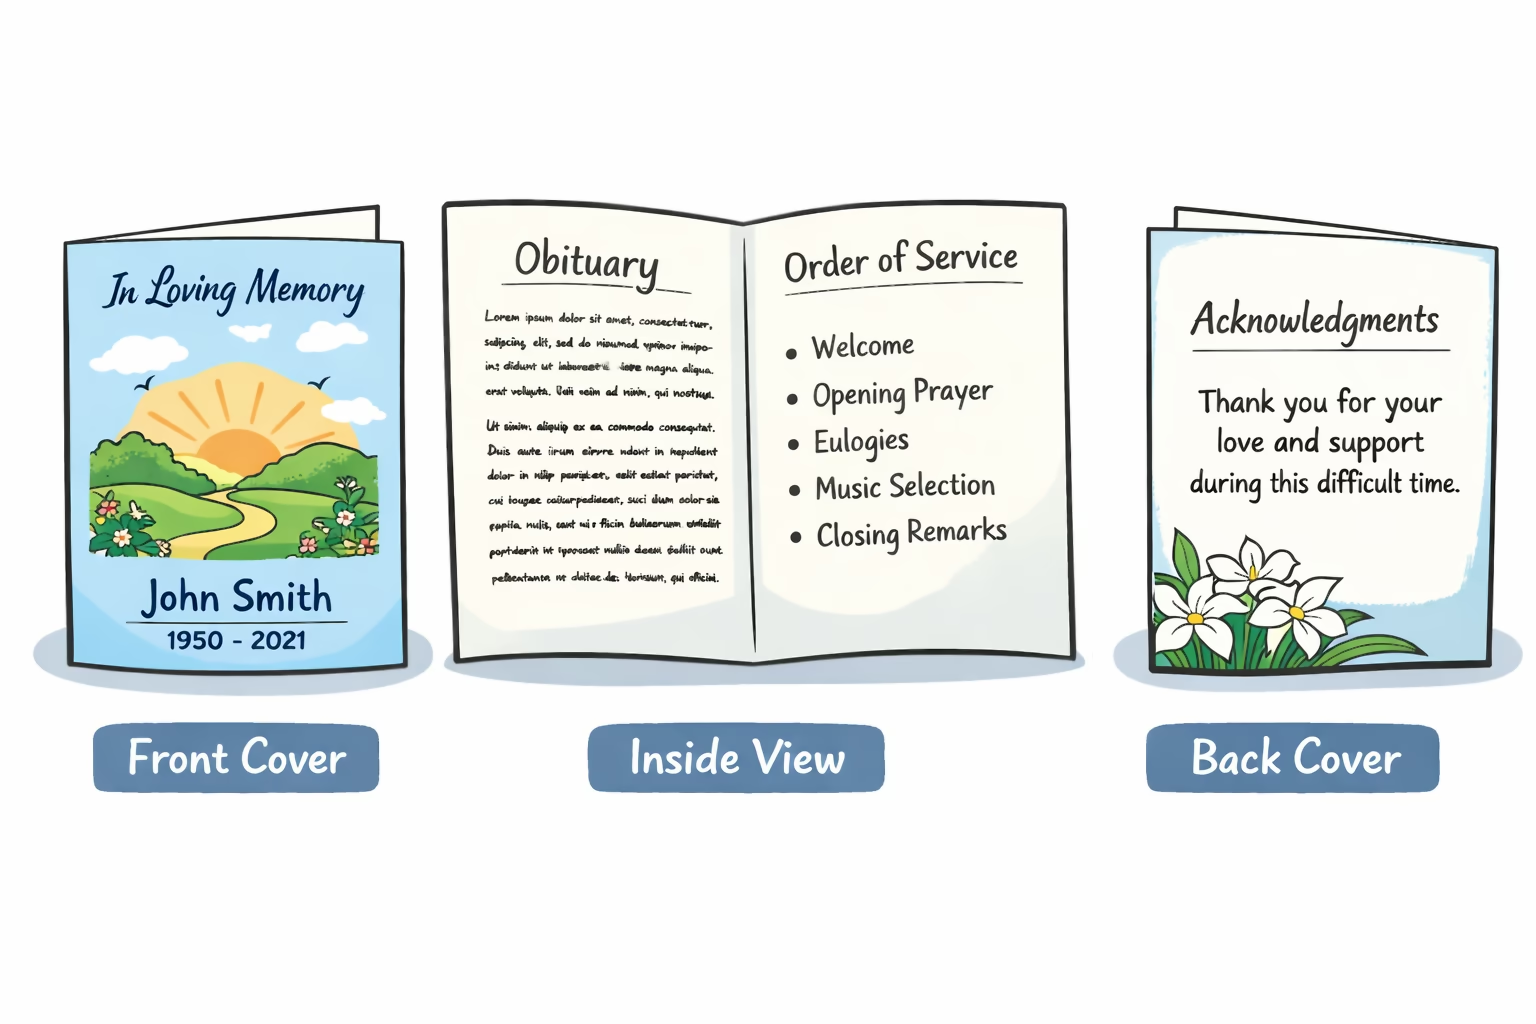
A standard bifold funeral program has four panels printed on both sides of a single sheet of letter paper.
Front Cover
The first thing guests see. Features the main photograph, the name of the deceased, birth and passing dates, and the service heading.
Inside Left Panel
Most commonly used for the obituary or life tribute. This is where you share the person's story: their background, values, family, and legacy.
Inside Right Panel
Reserved for the order of service. Lists the ceremony sequence so guests can follow along with readings, music, and remarks.
Back Cover
The closing panel. Typically includes an acknowledgment message, a poem or scripture, pallbearer names, or repast information.
This is the most common panel arrangement, but it is not a strict rule. Some families place the obituary and order of service on opposite sides, or dedicate the entire inside spread to a photo collage with a shortened service list. The layout should serve your family's needs.
How to Print a Funeral Program at Home
One of the advantages of creating your own funeral program is that you can print it immediately, with no waiting for a print shop turnaround. Here is how to get the best results from a home printer.
Paper
Standard US Letter paper (8.5 × 11 inches) is all you need. For everyday use, 24-pound copy paper folds cleanly and is widely available. If you want the program to feel more substantial (closer to a professional print shop result), look for 32-pound paper or 60-pound card stock at any office supply store. Matte finishes are generally preferred because they are easier to read, resist fingerprints, and fold without cracking.
Printer Settings
- Print double-sided (duplex): If your printer supports automatic duplex, enable it. If not, print one side, then flip the paper and print the other.
- Flip on short edge: This is the critical setting. When printing double-sided, select "flip on short edge" (sometimes labeled "short-edge binding"). This ensures the front and back of the program align correctly when the sheet is folded in half.
- Quality: Select "Best" or "High Quality" in your printer preferences. This makes the biggest difference for photographs.
- Scale: Make sure scaling is set to "Actual Size" or 100%. Do not select "Fit to Page," which can shrink the layout and shift the fold line.
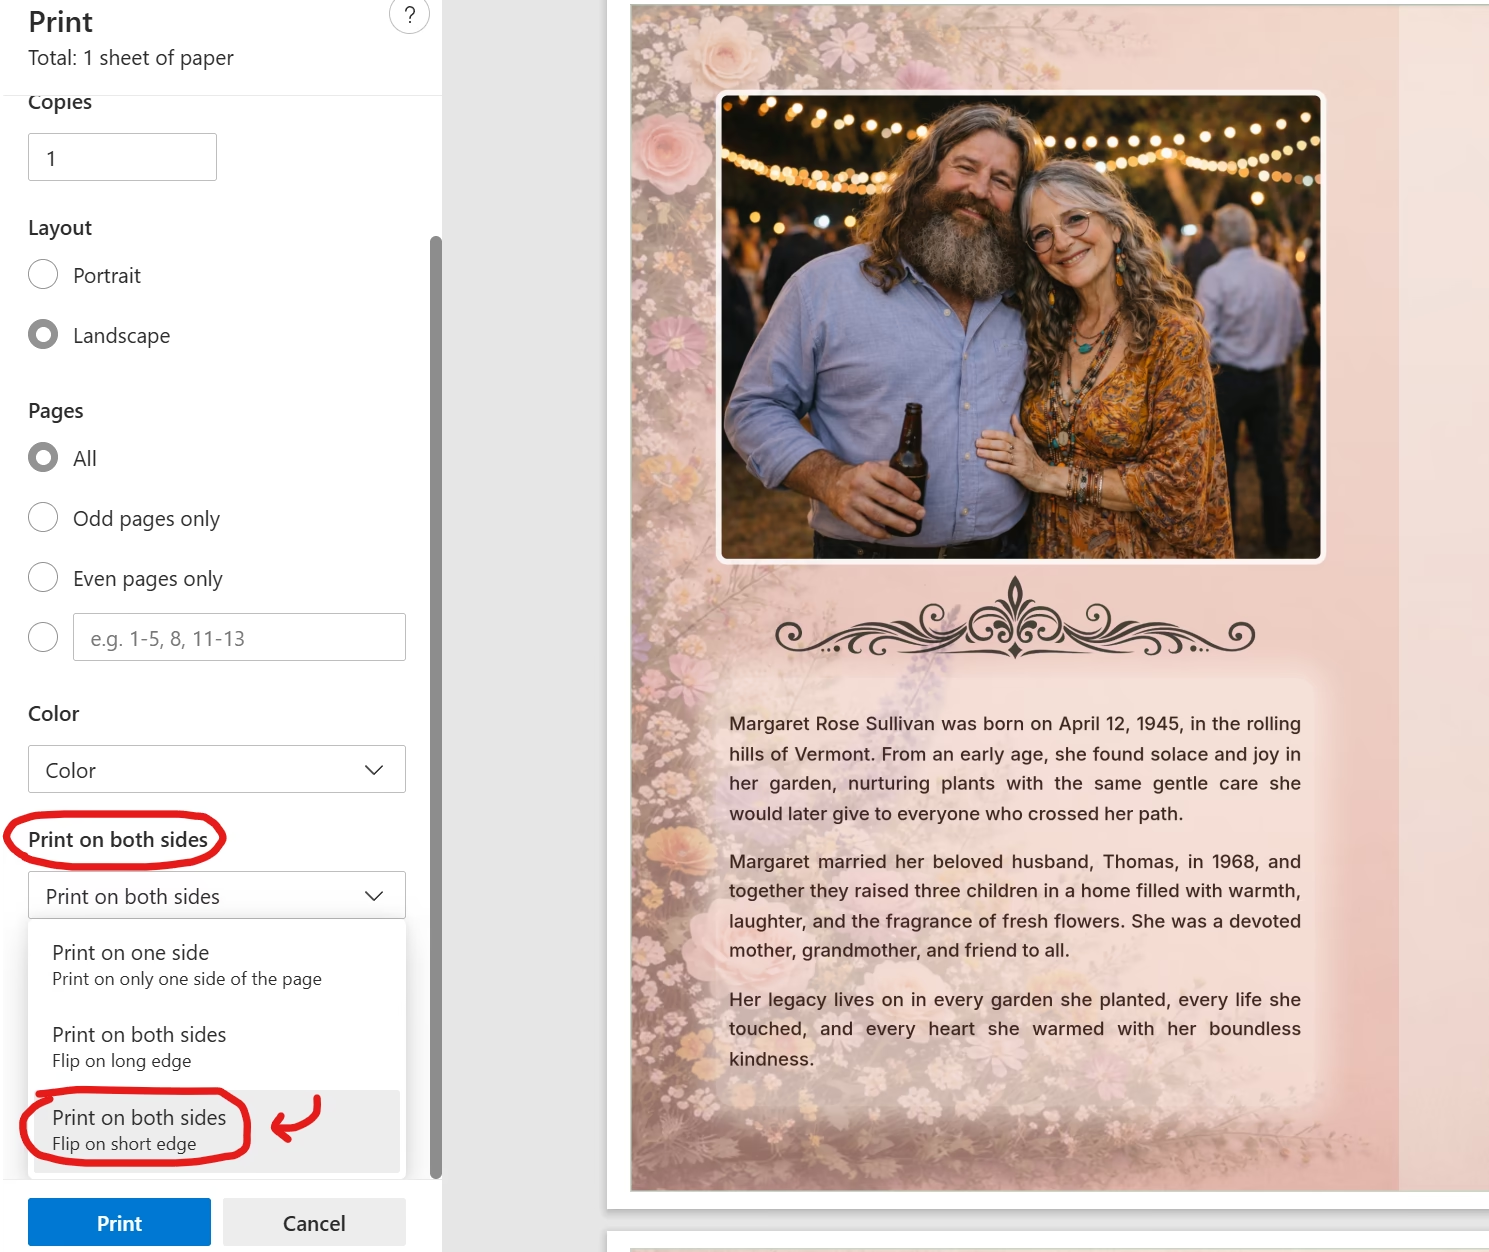
Select "flip on short edge" when printing double-sided so the panels align correctly when the sheet is folded.
Folding
After printing, fold each sheet in half along the center so that the front cover faces outward. Use a bone folder or the edge of a ruler for a crisp, straight crease. If you are printing more than 20 or 30 copies, consider folding in small batches to keep them neat.
Print Shop Alternative
If you need a large number of copies, want heavier paper stock, or would prefer not to handle double-sided printing yourself, take the PDF to any local print shop. Most shops can complete a same-day or next-day order, and the staff can help you choose the right paper weight and finish.
Common Mistakes to Avoid
- Overcrowding the panels. Trying to include too much text makes the program difficult to read. Leave breathing room around each section. If your obituary is running long, consider a slightly shortened version for the program and sharing the full text online or at the reception.
- Low-resolution photos. Small or heavily cropped images can look blurry when printed. Use the highest-resolution version of each photo you have. If you are scanning a printed photograph, scan at 300 DPI or higher.
- Skipping proofreading. Misspelled names or incorrect dates in a funeral program are deeply painful to discover after printing. Always have a second person review the program before you export the PDF.
- Forgetting to test-print. Print one copy first. Check that the fold line falls in the right place, that text is not cut off near the edges, and that the double-sided alignment is correct. This two-minute step saves hours of reprinting.
- Using "Fit to Page" when printing. This scaling option shrinks the layout and shifts the fold alignment. Always print at "Actual Size" or 100% scale.
Ready to Start?
Browse our templates, choose a design, and begin adding your content. Editing is free, and you only pay when you are ready to download the final print-ready PDF.
Browse Funeral Program TemplatesRelated Guides
Funeral Program Wording Examples
Ready-to-use text for cover lines, obituary sections, order of service entries, and acknowledgments.
Order of Service Template
Copy-ready ceremony sequences for standard funerals, Catholic services, and celebrations of life.
Funeral Program Examples
See how real bifold layouts look with different styles: classic, floral, Christian, and photo-rich.
Funeral Brochure vs Funeral Program
Understand the difference between funeral programs, brochures, and bulletins.
Frequently Asked Questions
How long does it take to make a funeral program?
Most families finish a complete bifold funeral program in under 10 minutes once they have their photos and service details gathered. The longest part is usually writing the obituary, which you can prepare ahead of time or adapt from a newspaper obituary you have already written.
What size paper do I need for a funeral program?
Standard US Letter paper (8.5 by 11 inches) is the most common size. When folded in half, it creates a four-panel bifold program that measures 5.5 by 8.5 inches, a comfortable size for guests to hold during the service.
Can I print a funeral program at home?
Yes. A print-ready PDF works with any home inkjet or laser printer. Print double-sided using the flip on short edge setting so the panels align when folded. Test one copy before printing your full run.
How many funeral programs should I print?
Print one copy per expected guest, plus 10 to 15 extras. Family members often want keepsake copies, and a few additional programs are helpful for guests who arrive unexpectedly. Because funeral programs print on standard paper, running extra copies is inexpensive.
What is the difference between a funeral program and an obituary?
An obituary is a written account of a person's life, usually published in a newspaper or online. A funeral program is the printed pamphlet handed to guests at the service. The program typically includes the obituary along with the order of service, photographs, and a closing message or poem.
Can I make a funeral program without design experience?
Yes. Online template editors are designed for people with no design background. You select a layout, add your photos and text into guided fields, and the editor handles spacing, fonts, and alignment automatically.
What is the best paper for printing funeral programs?
For home printing, standard 24-pound copy paper works well and folds cleanly. For a more polished feel, 32-pound or 60-pound card stock gives the program a heavier, more substantial quality. Matte finishes are generally preferred over glossy because they are easier to read and less prone to fingerprints.
Should I include photos in a funeral program?
Most families include at least one photograph on the front cover. Many also add additional photos on the inside or back panels. Photos make the program feel personal and give guests a meaningful keepsake. High-resolution images (at least 1 megapixel) will print most clearly.